What's new in MetaTrader 4
The history of updates of the desktop, mobile and web platforms
15 September 2015
4 September 2015
- Added support of two factor authentication (One-time password, OTP) for connecting to a trading account.
- In the iPhone version trades can now be executed from a chart at a single tap - turn the device into a horizontal position and open a quick trade panel.
- Various bug fixes and improvements.
4 September 2015
The latest version of MetaTrader 4 iOS supports two-factor authentication using One-Time Password for connection to a trading account. Now, a verification code can be requested in addition to login and password when logging in to a desktop or tablet terminal. The code is generated by the MetaTrader 4 iOS app. To start using one-time passwords, users need to bind their trading accounts to the password generator.

Another new option of MetaTrader 4 for iOS is trading from a chart
with a single touch (similar to one-click trading). Turn your device
into a horizontal position and open a quick trade panel.
28 August 2015
The first web version of the trading platform has been released. All trading and analytical features of a desktop terminal can now be accessed from a web browser. Trading on the web platform is safe, while any transmitted information is securely encrypted. Trading account passwords are encrypted and stored only in the local storage of the browser.
Web trading is already available for testing in the new Trading
section of the MQL5.community site. The interface of the web platform
is similar to the desktop version. The following functions are available
now:
- All types of trading operations: placing market and pending orders
- Real-time quotes in the Market Watch
- Customizable symbol charts
- 9 chart timeframes
- Basic analytical objects: horizontal, vertical, and trend lines, equidistant channels and Fibonacci lines
The functionality of the web platform will be further expanded.
1 July 2015
- Improved news section. Select news categories to follow what is interesting for you. Add the news items you like to Favorites to quickly access them wherever you need.
- Search news by headlines.
- New interface language: Hindi.
- Various bug fixes and improvements.
12 June 2015
Terminal
- Increased the maximum size of custom tooltips for
graphical objects to 128 symbols. The tooltips are set using the
OBJPROP_TOOLTIP property.

- Fixed display of the channel graphical objects when the Ray property is enabled - endless channel continuation to the right.
Market
- Enhanced logging when purchasing products. This facilitates looking for solutions when dealing with user issues.
- Fixed product rent renewal errors.
MQL4
- Fixed MQL4 application download when non-Latin (e.g., Chinese or Japanese) characters are used in a path name.
- Added the MQLSetInteger function for managing MQL4
application environment properties. Added the MQL_CODEPAGE property to
the ENUM_MQL_INFO_INTEGER enumeration. Using this property, the current
code page in a launched MQL4 program is used via the MQLSetInteger
function.
The code page applied when compiling an MQL4 application is used in that application by default. If there is a mismatch between operation system locales during a compilation and a program launch, there may be issues with displaying messages and receiving string values. This applies to the Print, PrintFormat, Comment, Alert, MessageBox, SendFTP, SendMail, SendNotification, iCustom and other functions where file names, graphical objects, global variables, etc. are used as parameters.
The new function and property solve this problem.
- Added another form of the ObjectsDeleteAll function:
int ObjectsDeleteAll(
   int            chart_id,   // chart ID
   const string     prefix,   // prefix
   int    sub_window=EMPTY,   // chart subwindow ID
   int   object_type=EMPTY    // object type
);
This function removes all graphical objects of the specified type from the specified chart or its subwindow. A special feature is the ability to set a prefix in the names of removed objects. For example, you can remove only the objects having the names beginning from "myobj_".
- Added the CHARTEVENT_CHART_CHANGE event generation when
using Home and End keys. Previously, this event was generated only when
changing chart sizes and properties via the appropriate dialog.
- Fixed the CHARTEVENT_OBJECT_CREATE event generation when
creating a graphical object by copying. Copying is performed by dragging
an object while holding Ctrl.
- Fixed the value returned by the ChartID function during the visual testing.
- Fixed receiving the OBJPROP_SCALE property for the Ellipse
graphical object. This property is designed for receiving an object
scale.
- Fixed checking the ArrayFill function input parameters. The function fills a numeric array with a specified value.
- Added the ArrayMaximum and ArrayMinimum methods to the
CArrayChar, CArrayShort, CArrayInt, CArrayFloat and CArrayLong classes
of the standard library. These methods allow you to search for the
maximum and minimum values in the respective arrays.
- Fixed the SearchGreatOrEqual and SearchLessOrEqual methods in the
CArrayChar, CArrayShort, CArrayInt, CArrayLong, CArrayFloat, CArrayDouble
and CArrayString classes of the standard library. The methods allow you
to search the arrays for the elements greater or equal/less or equal to
the specified one.
- Fixed errors in the CArrayChar class of the standard library. Fixed the QuickSort, QuickSearch, SearchGreat and SearchLess methods.
The update is available through the LiveUpdate system.
22 May 2015
Market
- The new feature in MetaTrader Market
allows providing products for rent for 1, 3, 6 or 12 months. This
provides undeniable advantages both for developers and buyers. Sellers
can significantly increase user confidence in their products, giving the
customer a chance to thoroughly check the product functionality at a
low cost. For buyers, the rent is another opportunity to assess a
product before buying it. Unlike demo versions, rented products have no
limitations except for validity period.
Any developer in the Market may choose whether or not to provide their products for rent, and what will be the cost of this rent.
Developers may choose not to offer their products for rent selling only full licenses for unlimited use.
If rent is enabled for a product, its web page shows possible options: rental period and price. Click "Rent" and select the rental period.
After expiration, you can either extend the product rental period or purchase an unlimited version of the product.
- We are introducing a new mechanism of "direct" purchasing. Purchasing a
trading robot or an indicator from the Market is now even easier, and
you do not even need an MQL5.community account.
One-Step Purchase
A user doesn't need to log in to an MQL5.community account and add money to it. A payment for a product can now be made straight from the platform using one of the available payment systems. To maintain a clear and unified history of purchases from the Market, the required amount will be first transfered to your MQL5.community account, from which a payment for the product will be made.
You can easily access and review all your payments from your MQL5.community Profile.
Purchase without Registration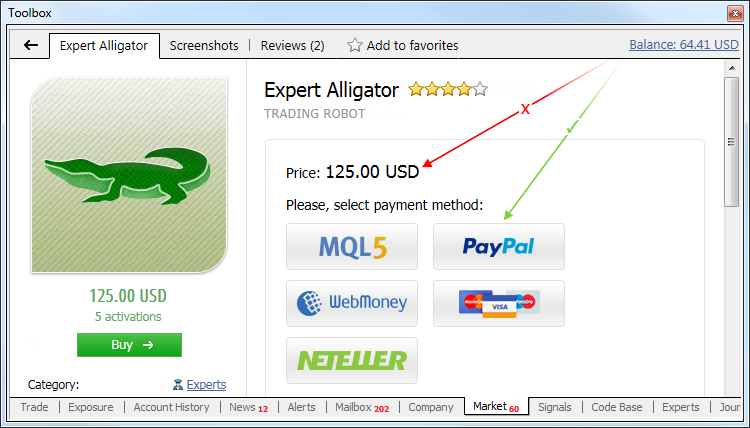
A product from the Market can be purchased without an MQL5.community account. Click "Buy" and pay for the product using one of the available payment systems.
Then you will be redirected to the payment system web page to complete your purchase.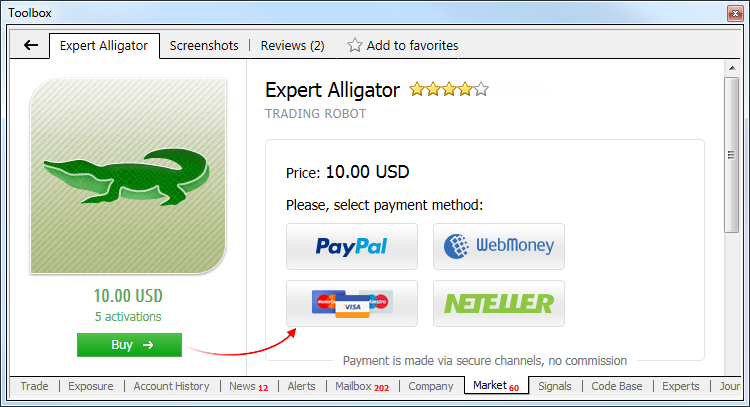
After that, we strongly recommend you to register an account on MQL5.community, and your purchase will be automatically linked to it. This enables you to update the product and install it on multiple computers.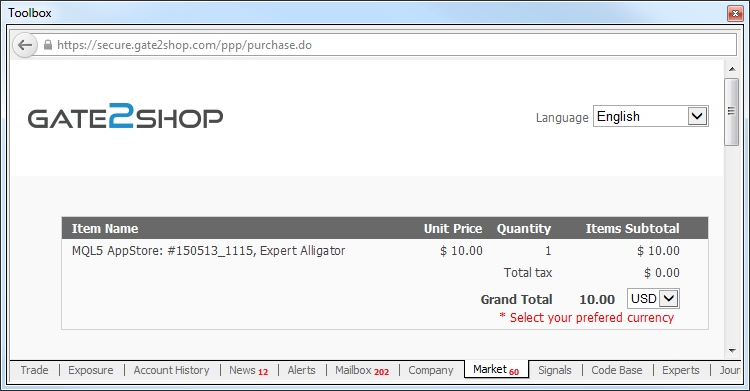
Tester
- The Strategy Tester now allows testing not only Expert Advisors, but
also indicators. This can be done in the visual testing mode. The
behavior of the indicator is shown on a chart, which is plotted based on
a sequences of ticks simulated in the tester.
This feature is especially useful for the users who want to purchase an indicator from the MetaTrader Market. Before purchasing an indicator, you can download a free trial version and see its backtest performance in the strategy tester.
Select the type of the program - "Indicators", then select the indicator and click "Start".
Virtual Hosting
- Multiple improvements and fixes have been implemented in the Virtual Hosting service.
The major changes apply to operation in Wine on computers running Linux and Mac OS. Now you can work with an allocated virtual server as usual: migrate it, monitor its performance and view logs.
The operation of the Log has also changed. If a user requests too many records, then only part of the first logs for the specified period will be downloaded. This prevents performance degradation resulting from large logs. If you want to download further logs, you no longer need to change the request period. Simply select the last line in the log viewer window and press PgDn.
Terminal
- The Market Watch window now features the current spread of a symbol.
Enable the spread information from the context menu.

- Added filtering of news by categories. Now you can customize the list
of news to your convenience. If a news category contains subcategories,
an additional dialog can be opened from the context menu, where you can
configure the list of news.

- Fixed crash of the client terminal when canceling computer turn off in Windows 7.
- The terminal interface has been further adapted for high resolution screens (4K).
- Fixed display of the "One Click Trading" panel on the chart.
- Fixed display of a graphical object set by a custom indicator, if the object is to be displayed only on some of the timeframes.
- Fixed terminal freezing during Search in MQL5 programs.
- Fixed drawing of Bitmap Label objects when using a .bmp file fragment.
- Fixed display of filled graphical objects "Channels".
- A new parameter DDE TIMESEC for sending quotes over DDE. This parameter allows receiving the quote arrival time to the nearest second.
- Fixed an error that could occasionally lead to the launch of multiple terminal instances from one directory.
- Fixed occasional crash of the client terminal in Windows 10.
MQL4
- To provide higher flexibility in the interaction with various web
services, a new form of the WebRequest function has been added. It
allows sending requests of any type with a custom set of headers
specified:
int  WebRequest(
   const string      method,           // HTTP method
   const string      url,              // url address
   const string      headers,          // Headers
   int               timeout,          // timeout
   const char        &data[],          // an array of the body of the HTTP message
   char              &result[],        // an array with the server response data
   string            &result_headers   // Headers of the server response
   );
Error notifications have been modified. If an error occurs, the 'result' array will contain the description of the error. - New function GetMicrosecondCount returns the number of microseconds that have passed since the start of the MQL4 program:
ulong GetMicrosecondCount();This function can be used to profile program execution and identify "bottlenecks". - In order to prevent tested Expert Advisors from "looking into the future", the FileOpenHistory function is prohibited in the tester.
- New signal property in the ENUM_SIGNAL_BASE_STRING enumeration - SIGNAL_BASE_CURRENCY which means the signal provider's deposit currency. The property can be received via the SignalBaseGetString function.
- New chart property in the ENUM_CHART_PROPERTY enumeration - CHART_SHOW_ONE_CLICK which means the display of the "One Click Trading" panel on a chart. The property can be received via the ChartGetInteger function.
- Fixed calculation of the indicator subwindow size when using #property indictor_separate_window.
- Fixed Expert Advisor deinitialization errors when changing the chart template.
- Fixed behavior of the CopyTime function. For example, before the update, CopyTime call for D1 from 23:00 December 1, 2014 to 01:00 December 3, 2014 returned three bars: December 1, 2, and 3 of 2014. After the update the function returns two bars: December 2 and 3, 2014.
- MQL5: Fixed access of MQL4 programs to offline charts.
- Fixed operation of the SeriesInfoInteger function in the strategy tester.
- Fixed values returned by ChartFirst and ChartNext in the strategy tester. Before the update the functions returned 0 instead of -1 if the list of charts ended.
- Fixed downloading of resources from EX4 files in the Libraries directory. Download of resources from library files did not work properly before the update.
- Fixed occasional errors in the results of the ChartXYToTimePrice and ChartTimePriceToXY functions.
- Fixed generation of CHARTEVENT_OBJECT_DRAG. Now the event is generated after dragging is completed, not at the beginning of it.
- Fixed generation of CHARTEVENT_CHART_CHANGE in custom indicators when moving a chart.
- Fixed use of global variables with long names (over 63 characters).
- Fixed some bugs in the compilation of macros.
- Fixed call of the DLL functions that return structures and strings.
MetaEditor
- Fixed formatting of variable descriptions in the drop down list of function parameters in MetaAssist.
Fixed errors reported in crash logs.
The update is available through the LiveUpdate system.
19 May 2015
- Display of the Ask line on a chart.
- A new category of messages for notifications from virtual hosting.
- Display of potential profit\loss when closing a position.
- Improved display of news contents.
- New interface languages: Thai and Ukrainian.
- Various bug fixes and improvements.
28 March 2015
- Improved chart display.
- Increased server connection speed.
- Fixed closing of orders with the "long only" property (when only buying is allowed).
- Added sorting on the "Trade" and "History" tabs.
- Added color highlighting of inactive instruments.
- Added ability to set chart shift.
- Various bug fixes and improvements.
26 March 2015
- Added display of profit/loss in the order close window.
- New panel for quick access to the main tabs.
- Added color schemes of the price chart.
- Added Thai and Ukrainian translations of user interface.
- Bug fixes and improvements.
27 February 2015
- Changed the application design to be consistent with the Google Style Guide.
- Added News.
- Added W1 and MN timeframes.
- Added Journal to display information about all events and trade operations.
- Added Greek and Portuguese translations, updated Czech translation.
- Bug fixes.
16 February 2015
- A new option allows creating an anonymous demo account to get started quickly with the application. Opening an account does not require any registration data and is performed in one click.
- The Vietnamese language has been added.
- Various bug fixes and improvements.
20 January 2015
- Support for 64-bit processors.
- Internal chat optimization: improved synchronization of messages and updated design.
- News support has been enhanced. The application now supports rich content and multimedia, as well as download of missing news upon connection to a server.
- The Malay language has been added.
- Various bug fixes and improvements.
12 December 2014
Virtual Hosting
- Hosting details now feature more information: the build
of the hosted terminal, the name of the processor of the hosting
server, the number of threads of the hosted terminal.

- The log viewer now features a convenient function for switching between
the terminal logs and the Experts journal. The logics of the log viewer
of the terminal running on a hosting server has changed. Now upon
pressing the "Request" button, the terminal immediately receives new
logs from the virtual server and displays them.

- Expert Advisors and indicators are synchronized even if the EAs and custom indicators are not running in the current configuration of the client terminal. In previous versions the synchronization was not performed in such cases.
- Signal synchronization algorithm has changed. Now during re-synchronization with the server, to which a signal has already been migrated, there is no need to enable the signal in the client terminal settings - it will be synchronized as active.
- A limit on the size of files transferred during synchronization has been introduced. The size of one Expert Advisor, indicator, library or data file cannot exceed 64 megabytes.
- Expanded logging of synchronization of the local terminal with the virtual one.
Trading Terminal
- Added display of the number of newsletters received in the last 24 hours.

- In the list of open orders and positions, fixed displaying of the "Profit" column in case Auto Arrange mode is off.
- Fixed calculation of the tooltip window size for graphical objects on the chart.
- Added translation of the interface into Uzbek and Tajik.
- Updated translation of the interface into Greek and Italian.
MQL4 Language
- Added generation of the CHARTEVENT_MOUSE_MOVE event (in the OnChartEvent entry point) at the right mouse button click on the chart.
- Added generation of OnChartEvent when enabling\disabling the Chart Shift and Auto Scroll properties of the chart.
- Added support for changes in chart properties CHART_SHOW_DATE_SCALE and CHART_SHOW_PRICE_SCALE using the ChartSetInteger function. Properties are responsible for showing the time and price scale. In previous versions their change has not been supported.
- Added an option for overloading template functions using array parameters.
- Added an option for overloading a method based on its constancy.
- The behavior of the ChartOpen function has changed. Now when specifying a timeframe different from the standard one, an attempt is made to open the appropriate offline chart.
- A new behavior in situations, when a value other than INIT_SUCCEEDED is returned from the OnInit entry point, in case of using #property strict in the EA. Now in case of an unsuccessful EA download, it is removed from the chart. Previously, under the conditions described, such an EA remained on the chart. If #property strict is not used, the previous behavior is valid - an Expert Advisor stays on the chart after the initialization error.
- Fixed error of first initialization of the predefined Bid and Ask variables.
- Fixed use of the indicator_height property during indicator loading. In previous versions this property was not used during generation of the indicator window.
- Fixed errors in the StringTo*Array conversion functions.
- Fixed setting of values for input variables with long names.
- Fixed the return value of the ObjectGetValueByTime function for the second channel line for the channel objects.
- Fixed the maximum\minimum values of the price scale of the chart, which are received using the ChartGetDouble and WindowPriceMin\WindowPriceMax functions in the OnChartEvent entry point after an event related to the chart window maximization\minimization.
- Fixed the operation of the ZeroMemory function for static arrays.
- Fixed the functioning of the Switch operator, when the case condition contains a negative value.
MetaTrader Market
- Fixed errors in formation of the list of favorite products.
- Optimized and accelerated loading of logos and screenshots.
Strategy Tester
- Fixed errors in additional loading of the price history before testing.
MetaEditor
- Fixed MetaAssist behavior when passing a pointer by reference.
- Fixed minimization of the "Terminal" window.
- Fixed MetaEditor crash when debugging and profiling looped programs.
Fixed errors reported on the forum and in crash logs.
The update is available through the LiveUpdate system.
25 October 2014
24 October 2014
Trading terminal
- Fixed an error that could occasionally interfere with launching the client terminal under Windows XP x64.
- Fixed generation of a file name when saving chart templates or a list of symbols selected in Market Watch.
- Fixed saving Rich Content news having quotation marks in their headers.
MQL4 Language
- Added reading CHART_BRING_TO_TOP chart property (a chart is displayed on top of other charts) in ChartGetInteger function.
         //--- move the chart up if it is not on the very top
         if(!ChartGetInteger(0,CHART_BRING_TO_TOP))
            ChartSetInteger(0,CHART_BRING_TO_TOP);
- Prohibited adding an MQL4 program to the chart, on which another MQL4 program is being debugged or profiled at the moment.
Fixed errors reported on the forum and in crash logs.
The update is available through the LiveUpdate system.
17 October 2014
Client terminal
- New Virtual Hosting service is now available. A
virtual server for a trading account can now be rented right from the
client terminal. Providing consistent connection to the trading server
and uninterrupted computer operation for Expert Advisors and copy
trading is now even easier.
Virtual servers are hosted by MetaQuotes Software Corp.'s partner companies
Allocating a Virtual Server
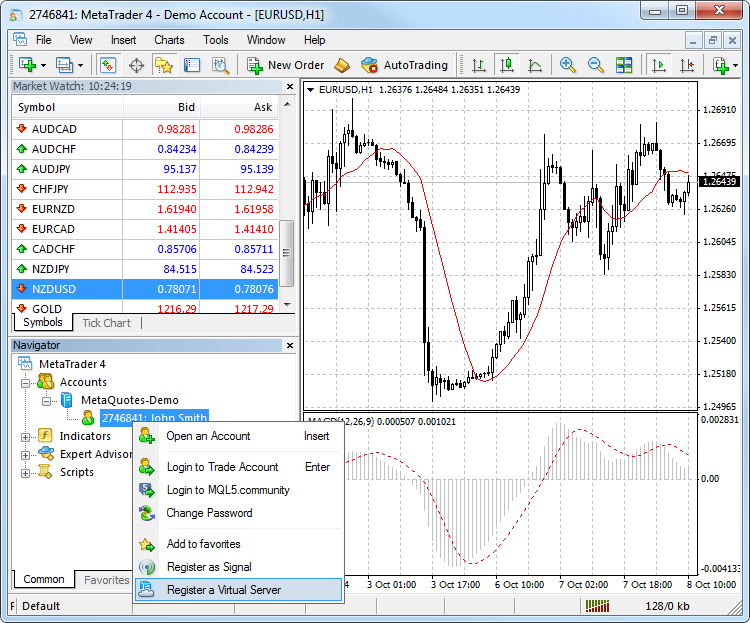
To receive a virtual terminal on a virtual server, connect using the necessary trading account and execute "Register a Virtual Server" command in the context menu.
Virtual Hosting Wizard window appears. It shows how the virtual hosting network works. The process of obtaining a virtual server consists of three steps. First, you will find out how to prepare for migration. After that, you will select the nearest virtual server with minimal network latency to your broker's trade server.
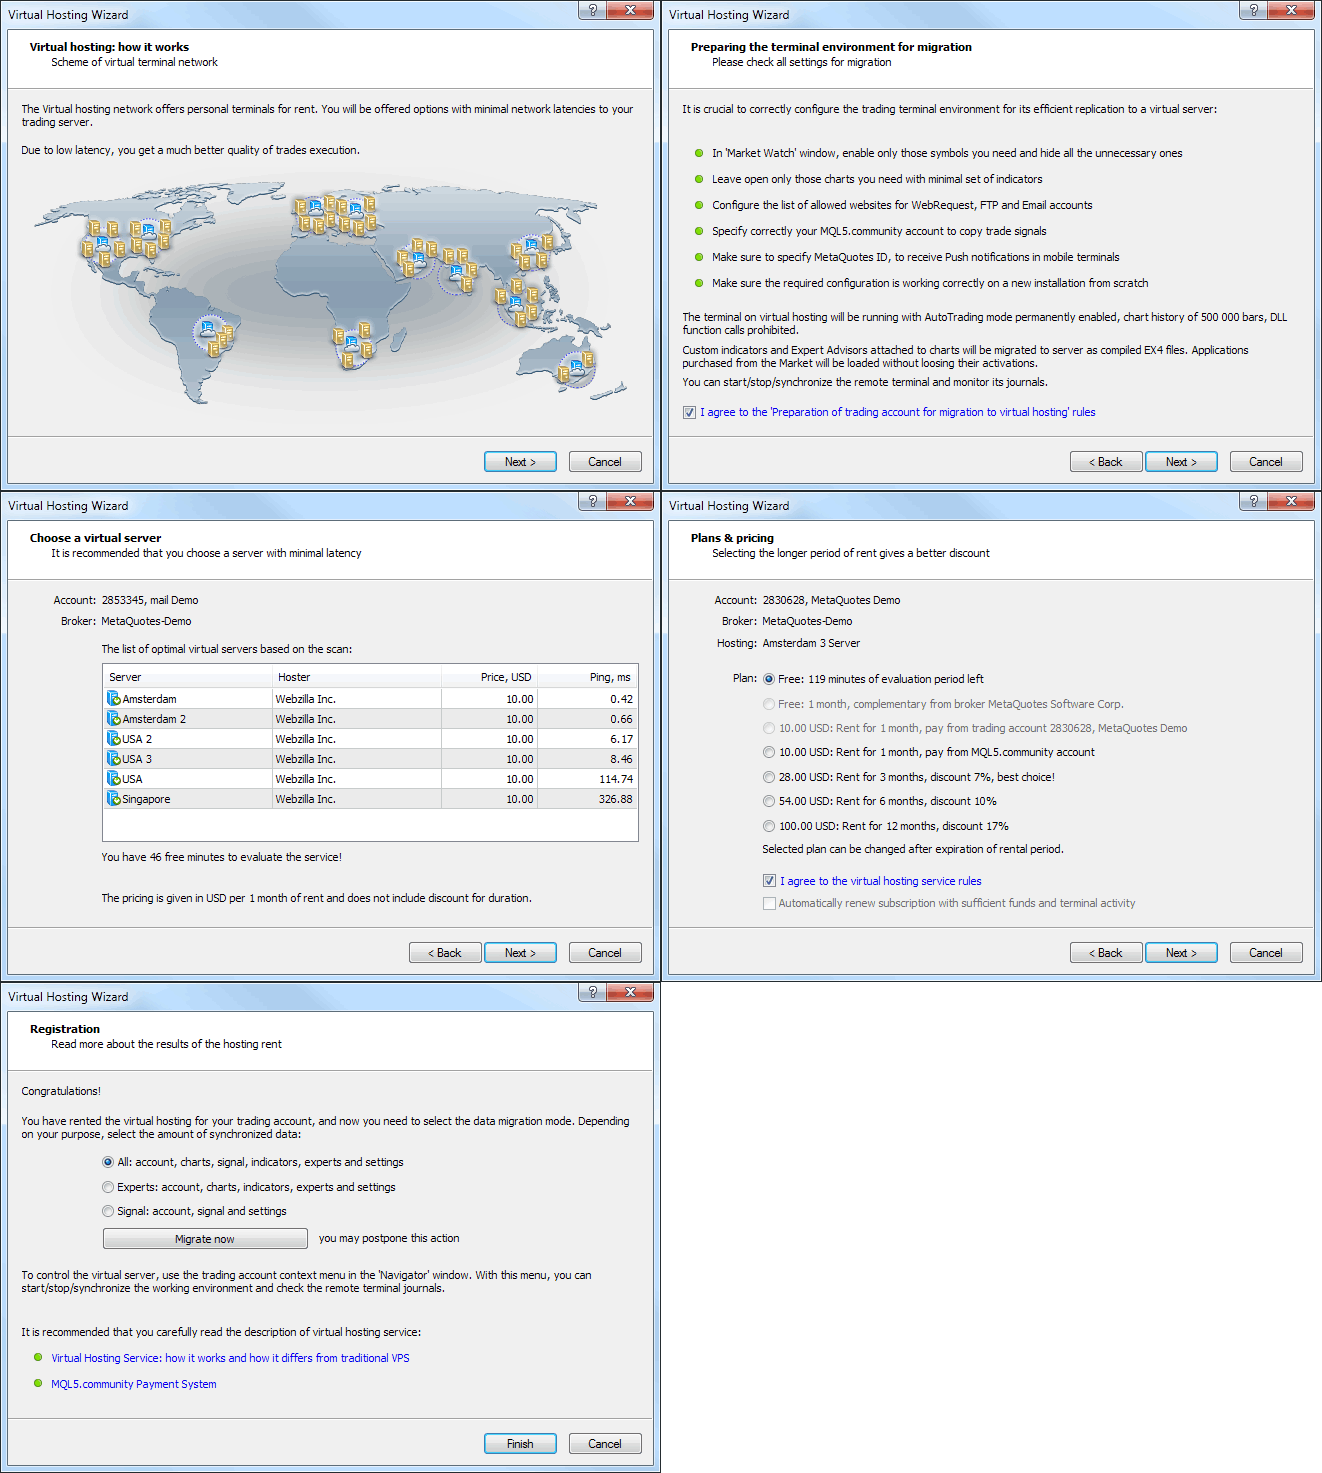
You can choose 1 440 free minutes provided to each registered MQL5.community user or select one of the offered service plans. Finally, you will select the data migration mode depending on your objectives:
- complete migration is necessary if you want to simultaneously launch Expert Advisors/indicators and trade copying;
- only Expert Advisors and indicators, if subscription to Signals is not required;
- only trade copying - only Signal copying settings (no charts or programs) are moved.
After selecting the migration mode, you can launch the virtual server immediately by clicking "Migrate now" or do that later at any time.
Preparing for Migration
Before launching the virtual terminal, you should prepare an active environment for it - charts, launched indicators and Expert Advisors, Signal copying parameters and the terminal settings.
- Charts and Market Watch - hide all unnecessary trading instruments from the Market Watch to reduce the traffic. Close unnecessary charts. In the terminal settings, specify the required value of "Max. bars in the window "- the terminal should be restarted after that.
- Indicators and Expert Advisors - attached the required EAs and indicators to your charts. Products purchased on the Market and launched on the chart are also moved during migration. They remain completely functional, and the number of available activations is not decreased. All external parameters of indicators and Expert Advisors should be set correctly.
- Email, FTP and Signals - if an Expert Advisor is to send emails, upload data via FTP or copy Signal trades, make sure to specify all necessary settings. Set correct login and password of your MQL5.community account on the Community tab. This is necessary for Signal copying.
- Permission to trade and copy signals - the automated trading is always allowed in the virtual terminal. To work with the signals, set copying parameters in the Signals section.
- WebRequest - if a program that is to operate in the virtual terminal uses the WebReqest() function for sending HTTP requests, you should set permission and list all trusted URLs on the Expert Advisors tab.
Migration
Migration is transferring the current active environment from the client terminal to the virtual one.
Migration is performed during each synchronization of the client terminal. Synchronization is always a one-direction process - the client terminal's environment is moved to the virtual terminal but never vice versa. The virtual terminal status can be monitored via requesting the terminal's and Expert Advisors' logs as well as virtual server's monitoring data.
To perform synchronization, execute "Synchronize Environment" command and select migration type.
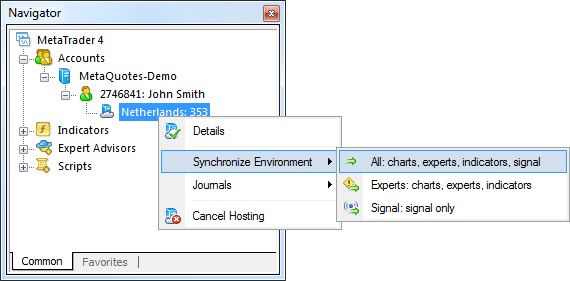
Thus, you always can change the number of charts and the list of symbols, the set of launched programs and their input parameters, the terminal settings and Signal subscription.
When performing migration, all data is recorded in the client terminal's log.

After the synchronization, open the virtual terminal's main journal to examine the actions performed on it.
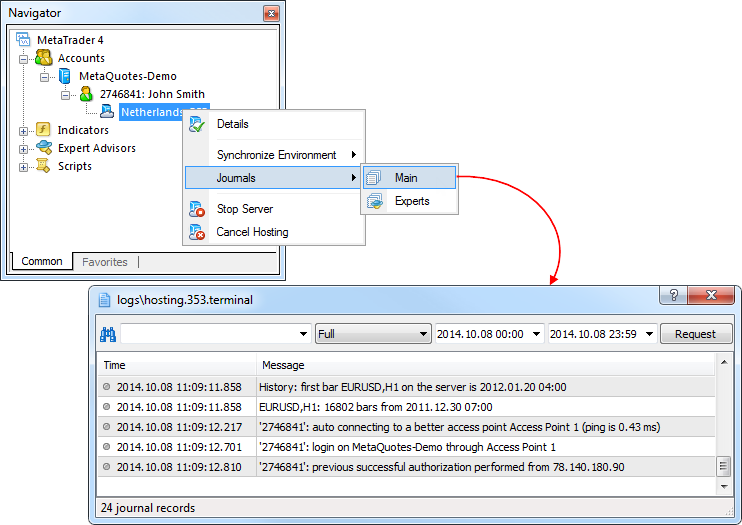
Working with the Virtual Terminal
The rented virtual server status can also be easily monitored from the client terminal. Execute "Details" command in the context menu.
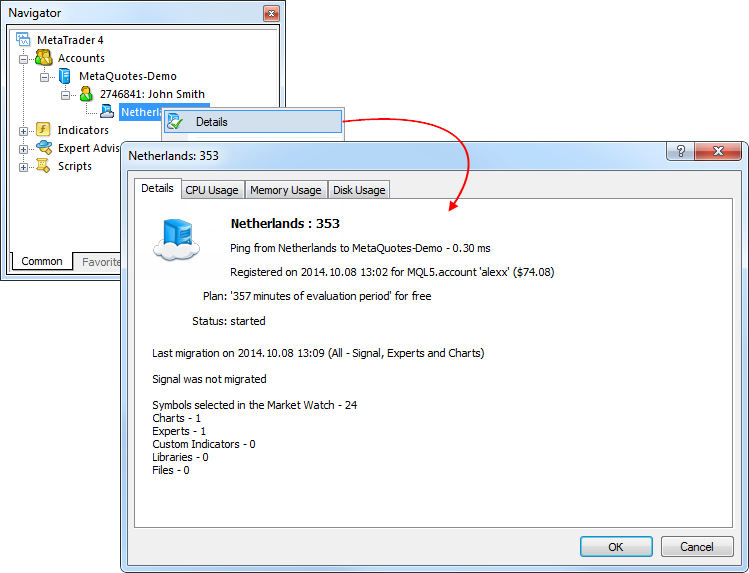
The information is presented in four tabs:
- Details - data on the virtual server itself and the terminal's active environment.
- CPU Usage - CPU usage graph, %.
- Memory Usage - memory usage graph, Mb.
- Hard Disk Usage - hard disk usage graph, Mb.
For more information about the service, please read the article "How to Prepare a Trading Account for Migration to Virtual Hosting" and "Rules of Using the Virtual Hosting Service".
- Work with news has been completely redesigned.
Support for rich content
Now the news support rich design and multimedia content.
Receiving the news released while the terminal is disconnected
Earlier, the terminal only received the news released while it was connected to the server. Now, the terminal connects to the server and downloads previously published news from it.
Separate storage of news for each server
Before this update, all received news were stored in a single database and were all displayed when a user connected to any account. Now news from each trading server are stored separately. Accordingly, only the news from a particular server are displayed when connected to a particular account. This provides a better structure of news items and a more convenient work with them.
- Fixed display of the "Event" object properties dialog, and its display in the list of objects.
- Fixed occasional absence of a newly added trade account in the Navigator window.
- Fixed errors in displaying and updating of the "Exposure" window.
- Fixed compatibility with Symantec Endpoint Protection.
MQL4 Language
- Changed the return type of functions OrderOpenTime, OrderCloseTime, OrderExpiration. Now datetime is returned instead of int.
- Added use of a default period (current chart period) in the SeriesInfoInteger function in case the period parameter is not specified.
- Fixed an error in changing the object properties from an Expert Advisor when dragging the object on a chart.
- Fixed checking of availability of a private constructor during compilation.
- Fixed error initializing class members in the constructor initialization list when using a template for the class constructor.
Fixed errors reported on the forum and in crash logs.
The update is available through the LiveUpdate system.
26 September 2014
Trading terminal
- Allowed specification of Stop Loss and Take Profit when opening a position for a Market Execution type symbol.
In earlier versions, the SL/TP levels could be set only from MQL4 applications in this execution mode.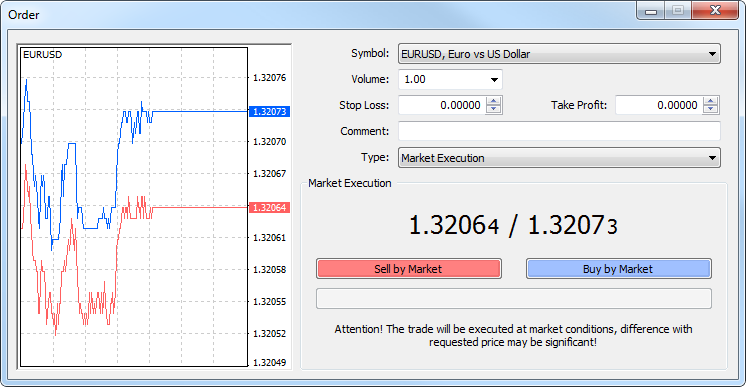
- Added a separate window to view the logs of the terminal, Expert
Advisors and Strategy Tester. It's a more convenient way to view logs
and filter them by keyword and date if needed.
To view logs, open the context menu of the Journal tab and run the Browse command.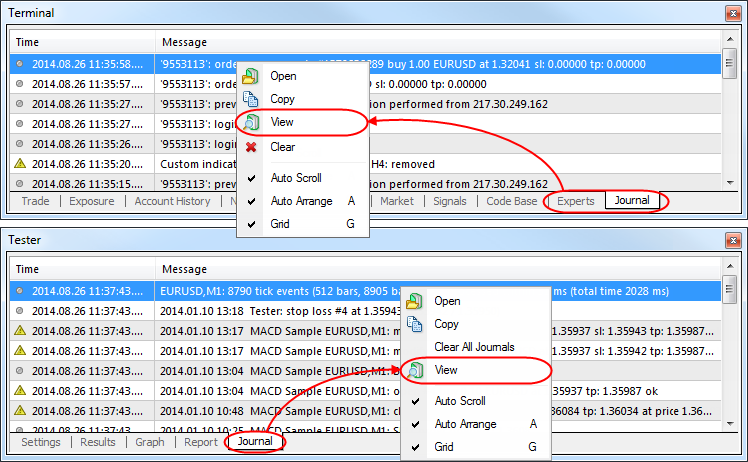
The upper part of the window contains the search bar to search in the log (only precise case sensitive search is performed) and the filter of entries (Full, Only errors). Time range for search can also be set. After specifying all the necessary search conditions, press the "Request" button.
- Search results for MQL5.community now contain "Blogs".
In this section, traders share interesting and useful information with
the community audience. Here you will find news from around the world on
a variety of topics - rumors about companies, reports on countries and
industries, market analysis, the latest trading developments, and much
more.
Share your ideas and trading achievements in the Blogs!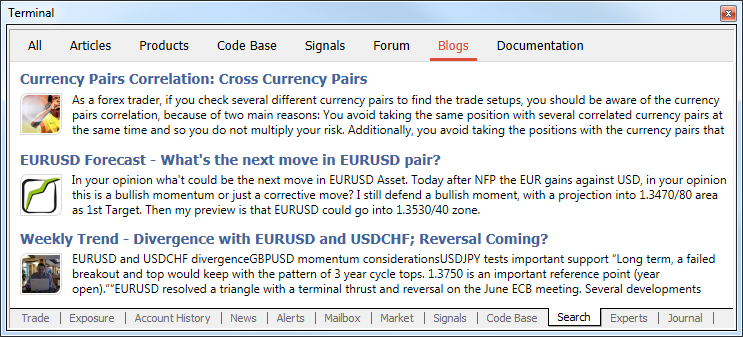
- New "Exposure" tab added in the "Terminal" window to show the summary
information about the state of trader's assets for all open positions.
This tab contains the following information:
- Assets - the name of a currency or financial instrument.
- Volume - client's position volume (in units) for the currency or financial instrument including leverage.
- Rate - currency or instrument rate in relation to the deposit currency.
- Deposit currency - this column shows the amount of deposit currency (excluding leverage) actually expended to buy/sell the currency or trading instrument.
- Graph - a graphical representation of the client's
position in the deposit currency (blue bars show long positions, red
ones denote short ones).
- Fixed
saving of the MQL4 programs tree state in the "Navigator" window when
closing the terminal. In some cases, the categories of MQL4 programs and
accounts opened during operation, appeared to be closed after the
terminal restart.
- In the Depth of Market added a
tooltip of the position close button; it contains a description of the
position being closed.
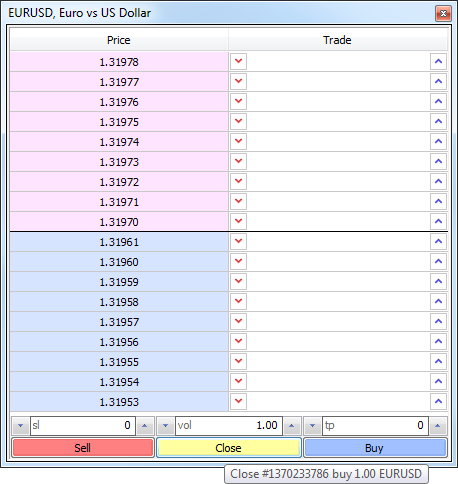
- Fixed modification of SL/TP values using the mouse wheel in the position modification dialog.
- Fixed deletion of a pending order that is dragged in the market depth
across the Bid/Ask price border to a level within the range, where
pending orders are forbidden.
In earlier version such a pending order was deleted. Now such an order stays unmodified. An appropriate error message appears in the journal.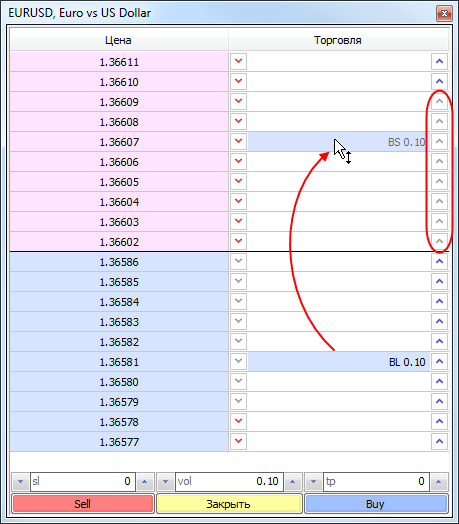
- Fixed an error that in some cases led to a false message "trade context is busy" in the terminal log.
- During the connection, the names of the trade server and the
access point the terminal has connected to are displayed in the
terminal's journal.2014.09.24 11:41:17.535 '2620818': login on MetaQuotes-Demo through Access Point 1
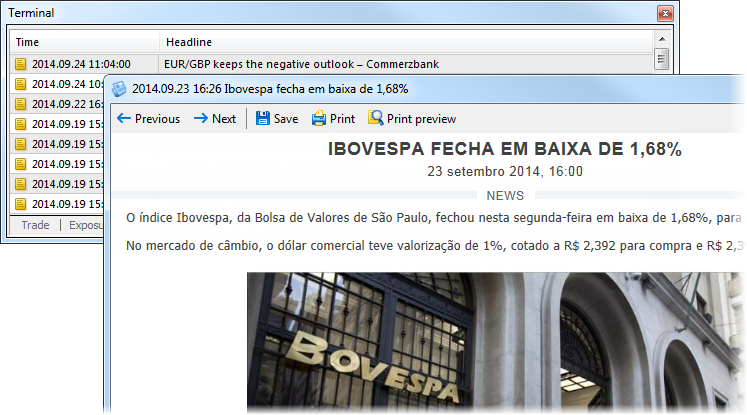
- Redesigned News tab and news display dialog. The works on
improving the news delivery system and rich content support are
underway.
- Fixed and improved scanning of access points when searching for the best connection.
- Added journal deletion commands to Experts and Journal tabs of Terminal window and Journal tab of the strategy tester.
MQL4 Language
- Fixed receiving of the trading instrument property "Currency Profit"
(SYMBOL_CURRENCY_PROFIT) using the SymbolInfoString function. Earlier,
instead of the profit currency the base currency was returned.
- Fixed errors in the IndicatorBuffers functions, which could appear during allocation of more than 16 indicator buffers.
- Added a new error code in trade operation execution - ERR_TRADE_EXPERT_DISABLED_BY_SERVER. It means that trading using Expert Advisors is disabled in the trade server settings.
- Significantly accelerated the operation of Copy* functions for working with price history.
- REASON_CLOSE value instead of REASON_CHARTCLOSE one is now passed to Expert Advisors, scripts and indicators as a closure reason when the terminal is closed.
- Added transformation of macro parameters into a string and
concatenation of macro parameters. Below you can find an example where
the concatenation of the macros allows deleting class instances
automatically.
//+------------------------------------------------------------------+
//|                                                     MacroExample |
//|                        Copyright 2014, MetaQuotes Software Corp. |
//|                                       https://www.metaquotes.net  |
//+------------------------------------------------------------------+
#property script_show_inputs
input bool InpSecond=true;

#define DEFCLASS(class_name) class class_name:public CBase{public:class_name(string name):CBase(name){}};
#define TOSTR(x) #x
#define AUTODEL(obj) CAutoDelete auto_##obj(obj)
#define NEWOBJ(type,ptr) do { ptr=new type(TOSTR(ptr)); \
                         Print("Create object '",TOSTR(type)," ",TOSTR(ptr),"' by macro NEWOBJ"); } \
                         while(0)
//+------------------------------------------------------------------+
//| Base class, required used for auto deletion                      |
//+------------------------------------------------------------------+
class CBase
  {
protected:
   string            m_name;

public:
                     CBase(string name):m_name(name) { }
   string            Name(void) const{ return(m_name); }

  };
//+------------------------------------------------------------------+
//| The class of auto deletion of objects allows you not to control  |
//| deletion of created objects. It deletes them in destructor       |
//+------------------------------------------------------------------+
class CAutoDelete
  {
   CBase            *m_obj;

public:
                     CAutoDelete(CBase *obj):m_obj(obj) { }
                    ~CAutoDelete()
     {
      if(CheckPointer(m_obj)==POINTER_DYNAMIC)
        {
         Print("Delete object '",m_obj.Name(),"' by CAutoDelete class");
         delete m_obj;
        }
     }
  };
//+------------------------------------------------------------------+
//| Declare two new classes CFoo and CBar                            |
//+------------------------------------------------------------------+
DEFCLASS(CFoo);
DEFCLASS(CBar);
//+------------------------------------------------------------------+
//| Main function of the script                                      |
//+------------------------------------------------------------------+
void OnStart()
  {
   CFoo *foo;
//--- create an object of the CFoo class
   NEWOBJ(CFoo,foo);
//--- create an instance of the class of auto deletion of CFoo foo object
   AUTODEL(foo);
//---
   if(InpSecond)
     {
      CBar *bar;
      //---
      NEWOBJ(CBar,bar);
      AUTODEL(bar);
     }
//--- It is not necessary to delete foo, it will be deleted automatically
  }
//+------------------------------------------------------------------+
Trading signals
- The showcase of signals has been completely redesigned. New features
added, design and usability of the Signals service improved.
New features in the list of signals: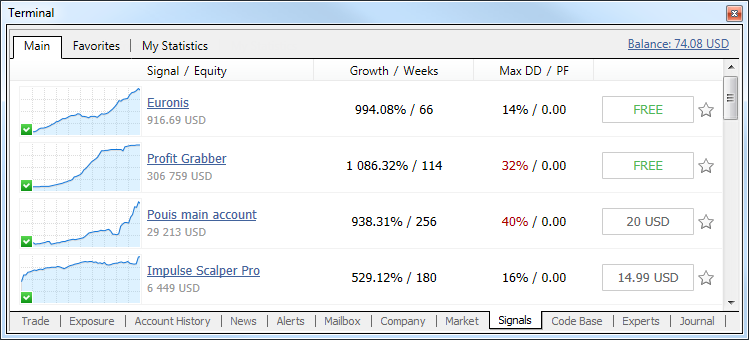
- The list of signals now contains growth charts similar to those displayed on the MQL5.community site. A green icon in the lower left corner of the chart indicates that the signal is based on a real account.
- Now subscription to a signal is available directly from the list. To subscribe, press the button with the price indication (or the word 'Free', if the signal is free). This will open a subscription confirmation dialog.
- Now signals can be added to favorites. Click the star icon at the end of the signal line. After that, the signal can be easily found in the "Favorites" tab.
- The context
menu has been removed. Now to find a signal to which you have
subscribed, go to any signal. The top panel shows the signal you are
subscribed to and a link to it.
Signal view page has been updated. A new option allows to add signals to favorites. The total state of the signal account is displayed when hovering the mouse pointer at "Growth". Signals statistics expanded:- The total amount of subscribers' funds.
- Trading account lifetime since its first trading operation.
- The average position holding time.
New tabs: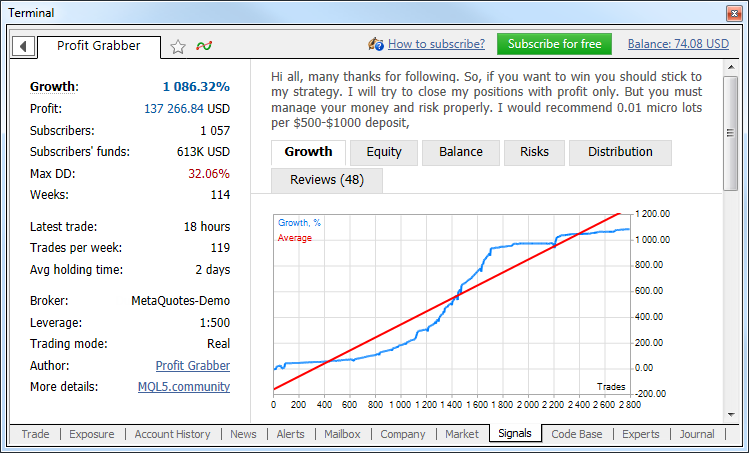
- Risks - information about the best and worst trade operations and series of operations, and information on drawdowns.
- Reviews - reviews of signal subscribers.
- News
- through this tab the signal provider can inform subscribers of any
change in the signal and post other useful information.
- Restrictions on signal subscriptions became milder:
- If
the trading history of the signal contains symbols that are not
available in the subscriber's terminal, the subscription is now allowed
(was prohibited in previous versions). The actions with the positions
for which the subscriber does not have symbols are ignored. An
information message appears in the journal:2014.08.26 16:44:29.036 '2620818': Signal - symbol GBPNZD not found
- If
the subscriber has positions and/or pending orders, a warning dialog
suggesting to close/delete them appears (as before). Now, however, it is
not an obligatory condition to continue working with signals.
Synchronization with the signal provider will be performed. Positions and orders that were opened not based on the subscription signal are left unchanged. The user can perform any operations with them.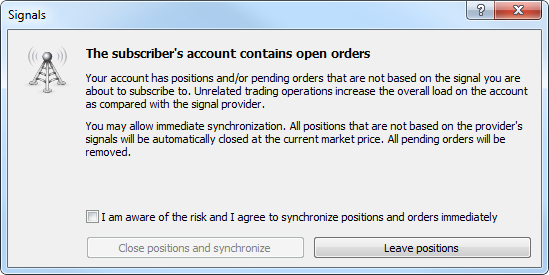
- Users can
now perform trade operations manually (or using an Expert Advisor),
being signed to a signal. The Signals service will ignore the positions
and orders opened by the trader.Keep in mind that placing orders manually affects the amount of available margin on the trading account. Opening positions manually increases the overall load on the account as compared with the signal provider.
- If
the trading history of the signal contains symbols that are not
available in the subscriber's terminal, the subscription is now allowed
(was prohibited in previous versions). The actions with the positions
for which the subscriber does not have symbols are ignored. An
information message appears in the journal:
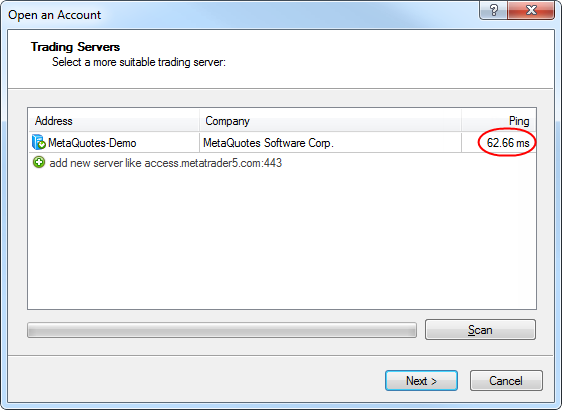
- Improved ping measurement accuracy. Ping is now measured three times, accurate to one hundredth of a millisecond.
Strategy tester
- Fixed calculation of commission as a percentage per annum during testing.
- Added display of Expert Advisor initialization errors in the testing journal during optimization.
MetaEditor
- MetaEditor: Fixed text replacement when the list of MetaAssist tips is collapsed.
Fixed errors reported on the forum and in crash logs.
The update will be available through the LiveUpdate system.
4 September 2014
- Added an option for editing the levels of indicators and objects
- Allowed specification of Stop Loss and Take Profit when opening a position for a symbol with the Market Execution type
- Added Portuguese and Greek translations
- Minor fixes and improvements
4 July 2014
Trading terminal
- Preparatory works for Cloud Hosting implementation.
Many traders want to arrange a reliable round-the-clock operation of the client terminal containing an active trading robot or following trading signals. One of the possible solutions is using VPS servers. However, finding a reliable provider, as well as diving into configuration and payment details require additional skills and time. Now, traders do not need VPS servers anymore.
Virtual Hosting Cloud is a server network distributed all around the world and supporting special versions of MetaTrader client terminal. Selection of a suitable location, service plan, payment and synchronization is fully automated. A trader needs to complete only 5 steps in order to rent the virtual copy of a terminal with minimal network latency to the broker's trade server and select the most suitable service plan directly from MetaTrader 4.
Virtual Hosting Wizard can be launched by selecting "Register a Virtual Server" command in the account context menu.
The first dialog window briefly describes and illustrates the main points of the virtual hosting operation.

After clicking Next, MQL5.community authorization window appears, where a trader should enter the account login and password or create a new account. If the existing login and password are already specified in the terminal settings, this step is skipped.

At the next stage, environment is prepared for migration to a virtual copy.

If you are sure that your terminal is ready for copying and you have read the rules, tick the "I agree to the 'Preparation of trading account for migration to virtual hosting' rules" option and click Next.
The wizard automatically scans all the access points and provides you with the list of the most suitable servers.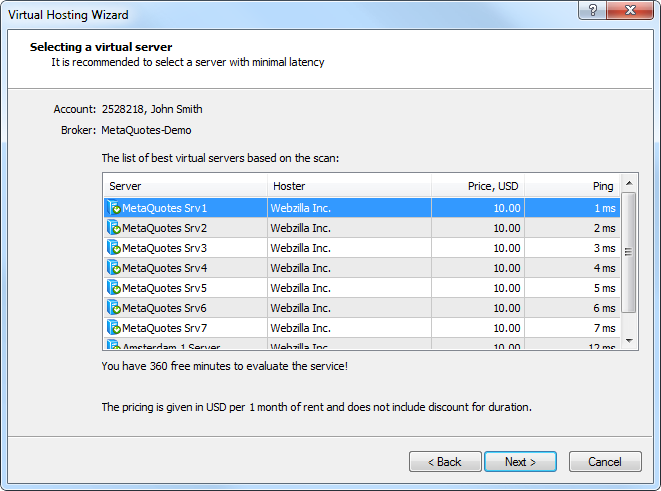
The following data is displayed in the table for each server:
- Hoster - the name of a hosting company offering the server for rent.
- Price, USD
- rent payment in USD per month. If the server is used for a long time,
the payment may be reduced, but discount is not displayed in this
window.
- Ping - a time interval between a request to the server and a response from it in milliseconds.
After choosing the most suitable server, click Next. The next window contains available service plans.
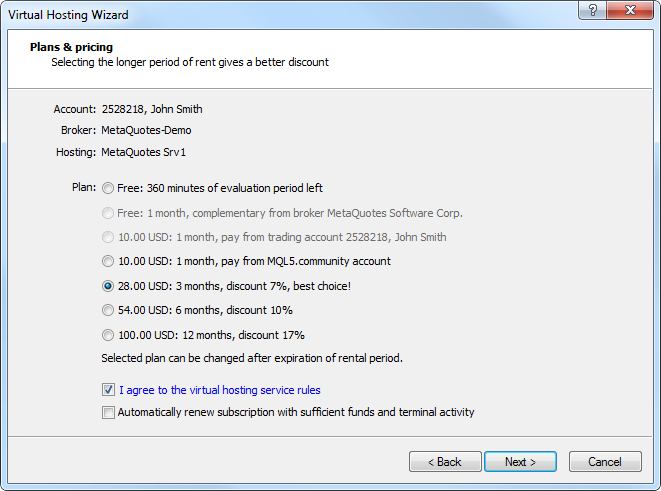
Select the most suitable service plan, tick the option "I agree to the virtual hosting service rules" and also the option "Automatically renew subscription with sufficient funds and terminal activity" if necessary. Click Next to go to the final step.
Registration for virtual hosting rent has been completed.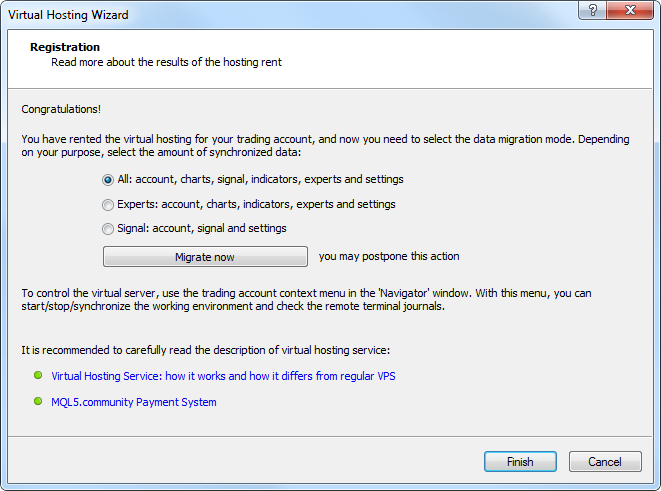
Now, the data migration mode and start time should be selected (data can be migrated right now or postponed). After making the final adjustments, click Finish.
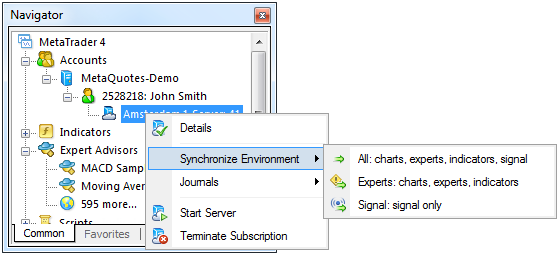
The additional context menu item for managing the server appears in Navigator window allowing traders to:- View the detailed information about the server.
- Synchronize MetaTrader 4 terminal environment.
- View MetaTrader 4 journal on the server.
- Start/stop the server.
- Terminate the server rent.
- Revised wizard of opening new account. Now, it is similar to the one in MetaTrader 5 terminal.
The first stage of opening a new account is selection of a trading server for connection. This window allows traders to select a proposed server or add a new one.
After selecting the server, click Next.
Account type is selected in the next window. Here the details of an already existing trade account can be specified or a new one can be created.
Click Next. When creating a new account, the next step is specifying personal details.

Fill in all the mandatory fields, tick the option "I agree to subscribe to your newsletters" and click Next.
The newly created account is registered on the specified server. After that, its details are displayed.
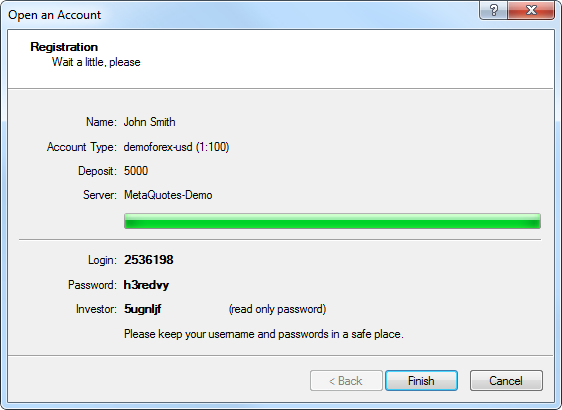
After clicking Finish, the newly created account is automatically connected to the trade server. It also appears in the Accounts section of the Navigator window. If Cancel is clicked in this window, connection to the trade server is not performed and the account is not added to the Navigator window, though it is already created. You can connect to the server later using the account details.
- Revised the Navigator's context menu.
- Login has been renamed to "Login to Trade Account" and added to the context menus of the "Accounts" and "<Server name>" sections.
- You can log in to MQL5.community not only via the terminal settings but also via the context menus of the "Accounts" section and its subsections.
- The following changes have been implemented to the account's context menu:
- Moved "Open an Account" command to the first position.
- Added "Change Password" feature.
- Added "Register a Virtual Server" command.
- The
list of compiled programs and the programs themselves can be refreshed
now directly from the context menu using the "Refresh" command. Terminal
restart is not required.


- In the "Navigator" categories "Indicators" and "Custom Indicators" have been combined into one category "Indicators".
All custom indicators, examples, and indicators purchased from the MetaTrader AppStore are now shown together with the built-in technical indicators. Technical indicators are now divided into four categories: Trend Indicators, Oscillators, Volume Indicators, and Bill Williams' Indicators. Built-in indicators are always displayed first.
- Added display of the current market for a trading symbol as the depth
of market having the ability of quick and easy order management. The new
tool allows placing, modifying and deleting orders quickly and with
maximum clarity providing the best trading opportunities.
The best depth of market prices are the current Bid and Ask for the symbol. The next level is set as the closest level allowing placing Buy Limit and Sell Limit orders considering stop level for the symbol. Further levels are set according to the symbol's price step.
Trade column contains buttons for one-click placing of pending orders. The order is placed at the price with a pressed button.- At a click on the blue arrow button in the area of Bid prices, a Buy Limit order is placed at the specified price. The same action in the area of Ask prices places a Buy Stop order.
- At a click on the red arrow button in the area of Ask prices, a Sell Limit order is placed at the specified price. The same action in the area of Bid prices places a Sell Stop order.
Pending orders, as well as stop loss and take profit levels of positions can be quickly modified by a simple drag-and-drop. If a limit order is dragged through Ask/Bid border, it will change to a stop order (Buy Limit is replaced by Buy Stop, while Sell Limit - by Sell Stop). The same rule applies when dragging Stop orders.
To quickly remove a level, hover the cursor over its line, hold down Shift key and click the cross button.
Using Buy and Sell buttons at the bottom of the depth of market, you can quickly place market orders with predetermined stop loss and take profit levels. - Fixed font display in the terminal search bar when working via remote desktop session.
- Changed location of chart windows in Tile Windows mode.
Tile Windows is the most widely used method allowing users to efficiently arrange several open charts for working with them. In this mode, the windows are displayed next to each other allowing you to monitor price changes on multiple charts. The following changes have been implemented to this function:- "Tile Windows" command is now available as a button on the "Charts" toolbar.
- This command has also been moved to the first place in the "Window" menu.
- "Tile Windows" command now also has its keyboard shortcut Alt+R.

- Fixed checking permission to trade when moving trading levels on a chart using drag-and-drop.
- Added ability to close a chart window by clicking middle mouse button on its tab.
- Fixed applying templates to charts. In some cases, indicator parameters from template were set incorrectly.
- Fixed display of the Label and Bitmap Label graphical objects with the
anchor point located in one of the bottom corners of a chart.
- Fixed balance graph generation in the report based on trading history.
- Fixed saving a template in case it is named in Japanese or any other hieroglyphic language.
- Added logging of stop loss, take profit and pending order triggering in the terminal journal. Entries are added in the journal only for the active trading account, and only if the terminal is connected at the time of activation.
MQL4 Language
- Added WebRequest function for
working with HTTP requests allowing MQL4 programs to interact with
different websites and web services.
The new function allows any EA to exchange data with third-party websites, perform trades based on the latest news and economic calendar entries, implement analytics, generate and publish automatic reports, read the latest quotes and do many other things that could previously be achieved only by using third-party DLLs of questionable reliability. The new feature is absolutely safe for traders, as they are able to manage the list of trusted websites the programs have access to.
WebRequest() function sends and receives data from websites using GET and POST requests. To allow a MQL4-program to implement such requests, the "Enable WebRequest for the following URL" option must be enabled in the terminal settings and URL-addresses of trusted sites must be manually explicitly specified.
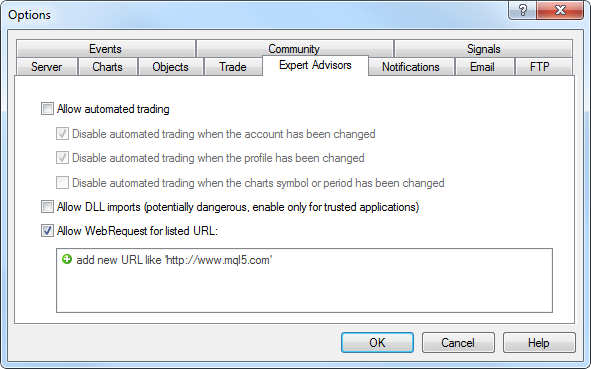
This option is disabled by default for security reasons.
- Added access to signals database and managing signals subscription from MQL4 applications.
Now, a user can receive the list of signals, evaluate them according to specific criteria, select the best one and subscribe to it automatically from an MQL4 program. In fact, it means the advent of the new class of trading robots that scan available signals and subscribe to the one that is most suitable at the moment.
To provide this, the new families of functions have been added to MQL4 language:- SignalBase*() — functions for accessing the signals database.
- SignalInfo*() — functions for receiving signal settings.
- SignalSubscribe() and SignalUnsubscribe() — subscription management functions.
By default, a trading robot is not allowed to change signal settings for security reasons. To enable this function, tick the "Allow modification of Signals settings" option in Expert Advisor settings.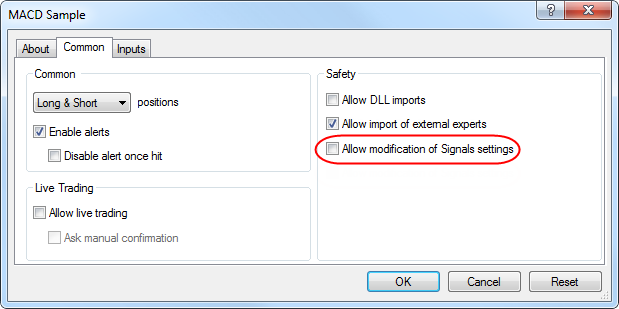
- Fixed display of OBJ_LABEL and OBJ_TEXT graphical objects when changing their texts from an MQL4 program.
- Adjusted the values of MQL4 application deinitialization reason macro definitions. Now, they are fully consistent with the corresponding values in MQL5.
- Fixed errors when changing dimensions of an MQL4 program settings dialog.
- Fixed an error in StringConcatenate function.
- Added definition of the custom indicators that are executed too slowly.
If the indicator is slow, "indicator is too slow" entry appears in the
Journal.
- Fixed FileSize function for files that are available for writing. Previously, the function returned the file size without considering the latest write operations.
- Added new properties of the client terminal that are available through the TerminalInfo* functions:
- TERMINAL_MQID - the property shows that MetaQuotes ID is specified in terminal settings.
- TERMINAL_COMMUNITY_ACCOUNT - this property shows that MQL5.community account is specified in the settings.
- TERMINAL_COMMUNITY_ACCOUNT - this property shows that MQL5.community account is specified in the settings.
- TERMINAL_COMMUNITY_BALANCE - value of balance on the MQL5.community account.
- TERMINAL_NOTIFICATIONS_ENABLED - shows whether sending notifications through MetaQuotes ID is allowed.
Trading signals
- Added display of a signal description considering an interface language.
- Fixed operation of signals in case of memory shortage when copying a signal.
MetaEditor
- Added ability to debug the template functions.
- Optimized work with large source text files (tens of megabytes).
Operation speed has been increased, while memory consumption has been
reduced.
- Fixed navigating through a source code using "Ctrl + -" and "Ctrl + Shift + -" shortcuts.
Fixed errors reported on the forum and in crash logs.
The update is available through the LiveUpdate system.